Friday, August 31, 2012

Dill Vinaigrette Dressing Recipe: Make your own!

{image: acefitness.org}
Don't put away your summery salads just yet! In fact, this delicious Dill Vinaigrette Dressing is one you can use all year long.

For the longest time I bought pre-bottled salad dressings, even if I didn't love them. I hadn't really even considered making my own dressing, thinking it would call for too many ingredients I didn't have.

Turns out I had all the fixin's for this delicious dill vinaigrette and you might too!
Dill Vinaigrette Dressing

Ingredients

1/4 cup vegetable oil
2 tablespoons red wine vinegar
1 1/2 teaspoons white sugar
1/2 teaspoon dried dill weed
1/8 teaspoon salt
1/8 teaspoon onion powder
1/8 teaspoon garlic powder
1/8 teaspoon dry mustard
1/8 teaspoon ground black pepper

Directions

Combine the oil, vinegar, sugar, dill weed, salt, onion powder, garlic powder, dry mustard and pepper. Shake or blend until all mixed. Put in covered container and refrigerate. Serve chilled.


It's even pretty shaken up. Such a lovely pale pink. The dill and red wine vinegar give it just the right touch.


Never miss a post! Subscribe to ShannonSews
Like on facebook.com/SSorensenDesigns
Follow @ShannonSews1 on Twitter
Subscribe to youtube.com/ShannonSews

Wednesday, August 29, 2012

Free online photo editing with iPiccy

edit photos online for free at iPiccy
I've used Photoshop for eons. It's always been my go-to for photo editing, until I met iPiccy. I tell you, it was love at first click.

iPiccy is a new free online photo editing website. It's online (no software to install). It does many functions Photoshop does in a snap. It's easy enough for anyone to use. And it's free. What? I know, right?!
*I don't secretly work for iPiccy, I just love it so much I wanted to make sure you all knew about it!

It's really easy to use, so no need to be intimated.


▶▶▶Here's a quick overview to see what iPiccy's like.◀◀◀

  • Just go to iPiccy.com and upload your photos

easily upload your photos with iPiccy's new online photo editing


  • You can find all the regular photo fixes for exposure, color, tone, sharpening, etc.

fix pictures online for exposure, color, tone

  • It has more advanced editing options with a click, i.e., eliminate blemishes, remove shine, airbrush...(everything she's already had done) hahaha
iPiccy lets you edit out blemishes, remove shine and airbrush for nearly perfect photos


  • You can quickly create a whole variety of photo layouts from their templates
Create a variety of photo layouts with iPiccy's online editing software
  • and even round the edges of your photos

Round corners of your photos with quick editing

  • There are options to add frames to your photos, create collages and add textured backgrounds.

Photo edits allow you to add frames, create collages and add textured backgrounds to your photos


  • "Filter options" change the tone and coloring of the photo (kind of like using color filters in Photoshop). I'm in love with the Anthony setting. It gives photos kind of an aged/washed look, making skin tones more creamy.

Editing filters give photos different tones and coloring

  • Artsy settings let you change photos into looking more like animations, comic books, aged pictures, pencil sketches or even Pop Art. Cool!

Online editor has setting for Andy Warhol-like Pop Art

This isn't all inclusive, but I hope it helps those of you who need a free place to edit your photos! 
Happy editing! ♥ 


UPDATE: Try Picmonkey.com! Great fonts, banners, layouts, etc. Sorry iPiccy, I think I have a new crush.


Never miss a post! Subscribe to ShannonSews
Like on facebook.com/SSorensenDesigns
Follow @ShannonSews1 on Twitter
Subscribe to youtube.com/ShannonSews

Monday, August 27, 2012

Hemming Pants DIY: Quick and Lazy Method

Hem pants tutorial quick and easy method
Every year before school started it was pants hemming time and my mom was down on the floor with her straight pins. I can still remember the feel of the little tugs at my ankles as she folded under the excess fabric and secured it carefully into place.

Then out with her needle and thread, she would sit and carefully hand stitch the new hem in place. Bless her heart. If my mother had a nickle for every pair of pants she hemmed for all of us 6 kids she'd be a very rich woman.

Flash forward to present day...and my dislike for hemming pants. I don't know why it annoys me, but it does. Why can't my pants just be the right leeeeennnnngth?! Ok. Tantrum over.

-------------------------------------------------------------------------

In-between bouts of whining, I discovered a way to hem my pants in no time at all. No cutting, no ironing, no turning under twice. Just measure, pin, fold under and sew.

*Note, this method for quick pants hemming works on pants that are only about an inch or two too long for you. I'll share a couple other methods at the bottom if you don't fit this category.

::How to hem pants the quick and lazy easy way::


Hemming pants accurately by measuring length with shoes on
STEP ONE: Put your pants on WITH shoes you will be wearing. If you don't measure your pants with shoes on, you may end up with high-waters...and we don't want that.


STEP TWO: Turn under your pant leg to your desired length (~1/2 inch higher than the base of your shoe) and pin the bottom edge. You can do this in front of a floor length mirror or use a helper.


Pin new hem in place by turning pants under evenlySTEP THREE: Remove your pants and turn them inside out. Turn all of your hem under to match the marked pin. This will become your new hem. The trick to this easy hemming method is that you do no cutting. You are simply folding under the excess fabric and sewing it to the underside of your pants.


Hem pants by folding under seam and straight stitchingSTEP FOUR: With pants still inside out and new hem pinned, sew a straight stitch all around the pant leg, stitching over where you start and stop to secure seam.


straight stitch hem under for clean finishSTEP FIVE: Marvel over your clean, finished work (view from inside). *I lightened these images so you could more easily see the seams. The pants are really jet black.


how to hem pants easily with a clean finished lookView from the outside (your new hemline).


easiest way to hem pantsEven if your hemline is a little higher up on the pant leg (because your pants were longer and you had more to turn under), this method would work. Here are the pants without lightening the image. Jet black seam = hardly even noticeable.


I think I still have a pair of gray pants I never wore last year because I put off hemming them. Now I don't have an excuse!


Never miss a post! Subscribe to ShannonSews
Like on facebook.com/SSorensenDesigns
Follow @ShannonSews1 on Twitter
Subscribe to youtube.com/ShannonSews

Friday, August 24, 2012

Fashion Trends: Fall 2012

Fashion color trends for 2012
{Pantone.com}
I know it's hard to think about autumn while the sun's still blazing high in the sky, but fall fashion is already in full swing.

Have you seen the new color trends for fall 2012? According to Pantone.com, the top colors this coming season are: French Roast, Honey Gold, Pink Flambe', Tangerine Tango, Ultramarine Green, Bright Chartreuse, Olympian Blue, Titanium, Rhapsody, & Rose Smoke. Some of them sound good enough to eat!

And what about fall fashion trends? I always get a kick out of checking Fashion Week reveals to see what patterns, textures, colors and styles to expect for the upcoming season.

I have to admit though, in some cases I used to think, "Who do they think would really wear that?" And then I heard someone say that the runway looks are to inspire you to think of the possibilities. That made much more sense to me.

Here are a few of the upcoming trends (& a few of my fave's) for fall 2012. It'll be here before you know it!  {*Sources & photo credits: Harpers BazaarMarie ClaireElleStylist}

Black and Navy = Together {♥} Love
Black with navy fashion trend fall 2012

Monochromatic White {♥} Dreamy
Wear white after labor day trending fall 2012

 Burgundy as the new black (Not sure I agree. I look better in black)

Fall 2012 trends burgundy as the new black

Hunting and Fishing / Leather and Laminates

Trends for Hunting and Leather in fall 2012

Military  
Military designs hit fall 2012 fashion

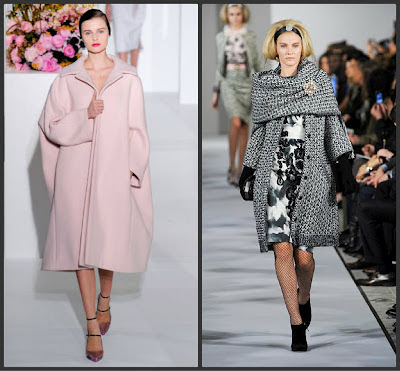
Oversized coats and shawls (I think it's pretty - very Grace Kelly)

2012 Fashions inspired by Grace Kelly


Intricate embroidery patterns and knit tweeds 

Fall 2012 brings tweeds and intricate embroidery designs

Other trends mentioned? Reptile print, jumpsuits, gold glitz, suits, ornate tapestry Renaissance style, velvet, bold mini-floral prints, feathers and fur accents, blanket coats, headbands and statement hats. Really? I couldn't resist ending with this one.

I do love the Oscar de la Renta headband with a dash of bling, but the hat? Looks like the head of a the giant cartoon character...but remember - it's to inspire. not to wear. I guess.


headbands and statement hats appear in fall 2012 fashion trends


Never miss a post! Subscribe to ShannonSews
Like on facebook.com/SSorensenDesigns
Follow @ShannonSews1 on Twitter
Subscribe to youtube.com/ShannonSews

Wednesday, August 22, 2012

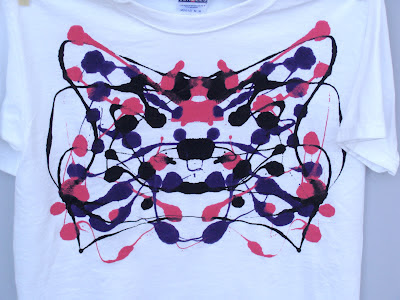
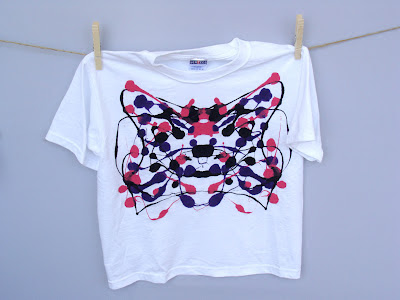
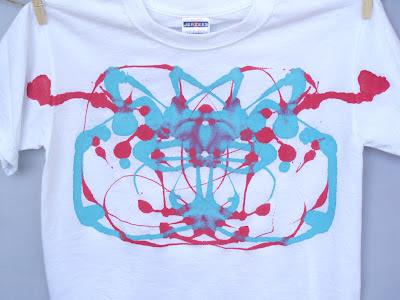
New Ink Blot T-shirts in the shop

I couldn't resist making a few more Ink Blot T-shirts for my shop. A couple for adults and a handful for kids.

I'm always anxious to see how each paint "splatter" will turn out and love to hear what people see in each design.

Here's my 2 cents.

This one I call the Cave Man
(size Adult Medium)
Available here

Random painted design


fabric painted t-shirt

This one's a flying frog, wingspan out.
(size Young Adult XL or Adult M-L)
Available here
fabric painted design


ink blot t-shirt

I can't be the only one who sees a wittow mouse, now am I? Clear as day.
(size Child M)
Available here
kids painted t-shirt

Kids unique mouse t-shirt

Creature with electricity shooting out the sides. Clearly.
(size Child M)
Available here

Abstract childs t-shirt design


unique fabric painted design

Wings of angels
(size Adult Small)
Available here
abstract art t-shirt

blue and orange designed tee

It's all about imagination people! 
You should have heard all the ideas the kids came up with as they saw each shirt when we did our 50 ink blot t-shirts project at school! I learned a thing or two about what real imagination is!


Never miss a post! Subscribe to ShannonSews
Like on facebook.com/SSorensenDesigns
Follow @ShannonSews1 on Twitter
Subscribe to youtube.com/ShannonSews

Monday, August 20, 2012

Sew an easy top or dress from two scarves

sew an easy shirt with two scarves
At the beginning of the summer I was on a mission to find 2 coordinating scarves to make into a swanky top, because of this tutorial.

I looked at every thrift store in town, but had a hard time finding them, until I stumbled on two matching scarves. Bonus!

They were 35x35 (larger than I wanted), but as it turns out, it's enough to even make a dress!


Okay, let's get to it.


Here's how I made a lovely breezy top 
from just two scarves 
(& a dress, just to show you how it's done).


find two thrifted scarves to sew into a shirt Start by finding 2 coordinating (or matching) scarves. My scarves are a soft polyester. Thrifted: $3.99 each.


Be sure to set your pressure dial to 1 (so your pressure foot is more gentle on the fabric) and use a small needle (I used a 9) so you don't leave holes in the delicate fabric.


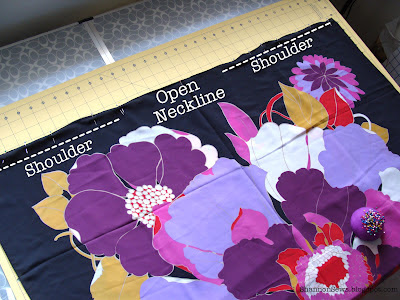
sew shoulder seams but leave opening for neck
Measure how wide you want your neckline to be. Mine was about 10-11 inches.

Put your scarves right sides together. Mark the center.

Using the neckline measurement, leave measured space open in the center. Pin and sew your shoulder seams.


sew up sides of scarf, leaving sleeve hole open
Next, measure how wide you want your sleeve opening to be and mark it so you know when to stop sewing.

Pin and stitch from the hemline up to stop mark.


Sewn dress made with two scarvesTHE DRESS: If you wanted to make your scarves into a dress, you're all done (I tied a sash around it). Can you believe how easy that was??!! 

If I were totally hip I could see myself wearing this as a dress with dark purple leggings and black shoes.

Dang it! I'm not quite hip enough...so I'll be doing some trimming and turning it into a shirt instead.

But first, here are a few more shots of the dress, without the sash:

  
scarves sewn to make a dress is fashionably flowyWithout defining the waist, its pretty mumu flowy.  Some people can totally get away with that, but not me. I'm mumu enough as it is.


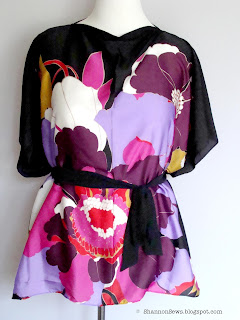
easy flowery shirt sewn from refashioned scarves
THE SHIRT: To make the dress into a shirt, it really is as easy as it sounds = Cut off the bottom.

And hem it. (blah). The purpose of this thrifty project was to find 2 scarves to easily sew into a top. There was to be no hemming. No hemming! It was almost all it was cracked up to be.

I ended up cutting off about 6 inches and hemming the bottom.
Then I added 2 belt loops on the side, to hold my sash in place (it's still mumu roomy without a sash).

Fashion flower pattern is in for fallI love the flow of it. And the flowery colored prints are right on for fall.

Top sewn from two scarves creates a delicate flowy feel

So feminine and pretty. I think I'll be wearing it with a black pencil skirt.
It even created it's own drapey cowl neckline. add belt loops to a shirt to hold a sash at shannonsews dot blogspot dot com

If you've made yourself a shirt or dress out of a scarf, I'd love to see it!
It's so darn easy. 
I'll be on the lookout for more square scarves, this time a little more my size (no hemming ;). ♥


Never miss a post! Subscribe to ShannonSews
Like on facebook.com/SSorensenDesigns
Follow @ShannonSews1 on Twitter
Subscribe to youtube.com/ShannonSews


Linked to:
Tip Junkie handmade 

projects

Friday, August 17, 2012

A little break from sewing: Seattle day trips

sewing time gets shorter with return to school
{Pinterest}
I can't believe it's almost time for schoo [DON'T SAY IT!]. Okay, out with it: "I'm not ready for summer to be over!" Ahhkk. (I just got light headed)

Time to get back to my school-year job and regular routine. I knew summer would fly by much too fast. Soon I will see all those cute smiling faces again. And hear colorful stories of summer adventures. Fingers crossed that September will hold on to some sunshine, before we roll into the darker days of fall.

Ok, before I launch myself into a depression, I wanted to share a couple little day trips I crossed off on my summer to-do list. Whew! Glad I got at least a couple in!

There's a little place called Mukilteo (good luck pronouncing that) on the shores of Puget Sound. It's only about 40 minutes from where we live so it's our go-to when we need a little beach time.

taking a break from sewing to relax at the beach

There's something about sitting at the beach that just washes you over with peace. The sound of the waves, the roll of the tide, the call of the seagulls. Ahhhh, heavenly I tell you. I could sit here for days. And sleep here if it wasn't against the law.


And it even has a lighthouse. ♥


Ivar's always tops off my visit to Mukilteo. I had the fish n' chips here for the first time a couple years ago and now I literally think about it from my last bite until I have it again. It's that good. And I'm that crazy.


Heading farther north, a bit farther from home, is another favorite beachy spot. Deception Pass. If you visit Seattle in the spring or summer, it's a must see. It's one of the most beautiful places. Makes me want to sell everything I own and live on a boat.

I always make us stop and walk over the metal arched bridge. The views are breathtaking.


Photo on left (below) is a view from the bridge. The one on the right is before you get onto the bridge. Sigh. (sorry my horizon is a little tilted. hope you don't get sea sick.)


After we did our bridge-walking, we found a little nook on the beach to sit and relax - to the roar of the waves and delicate tumbling of weathered rocks. Well, and the occasional, "Billy, come over here and finish your hot dog!" It's a popular place in the summer. But we lucked out with a pretty quiet day.


Now you can see why I'd like summer to last just a little longer. 
So I could do this all over again. xo


Never miss a post! Subscribe to ShannonSews
Like on facebook.com/SSorensenDesigns
Follow @ShannonSews1 on Twitter
Subscribe to youtube.com/ShannonSews
Blogging tips